

TLDR;
Download the Wireshark for WiFi profile now or read on.
![]()
Wireshark
Even if you’re an avid user of some of the premium packet analysis tools out there, such as Savvius’ excellent Omnipeek, every so often most people will be opening up the free Wireshark to look at a capture.
Unfortunately the default view included with Wireshark is very poorly suited to 802.11 packet analysis:
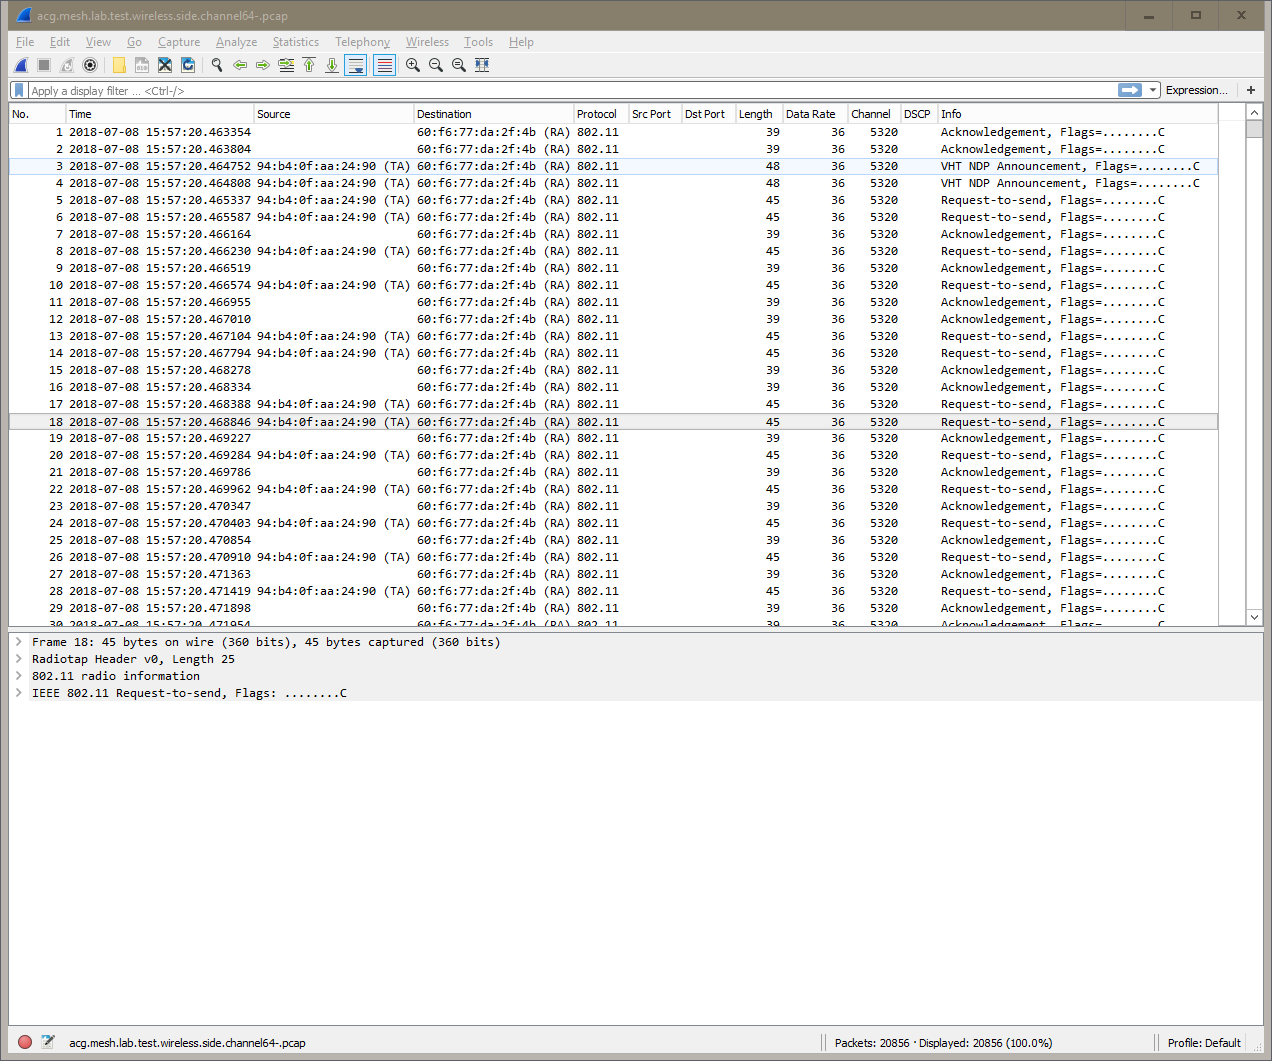
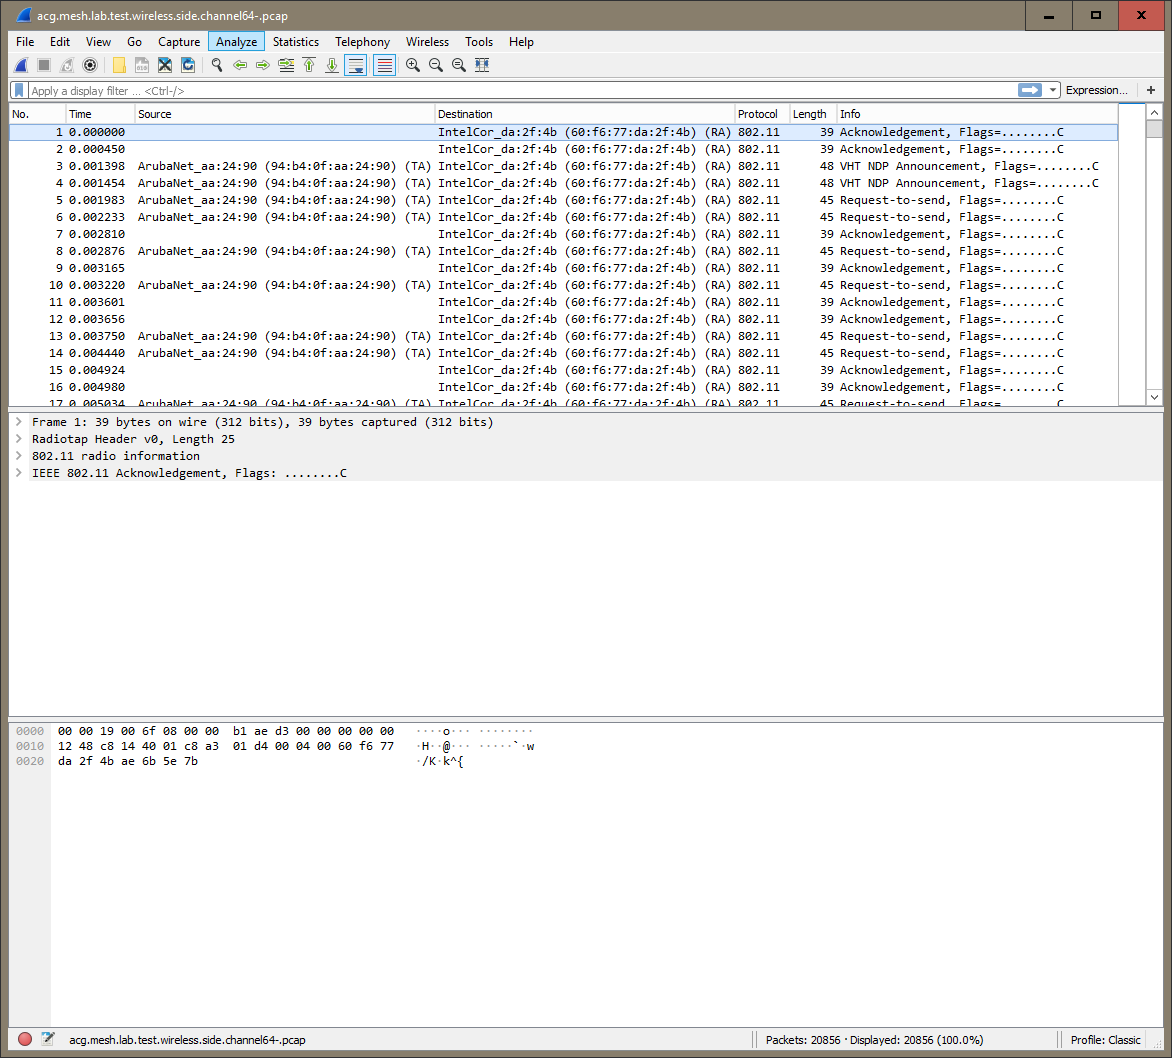
The classic view is no better:
The Problem
The problem is that WiFi frame headers are different and far more variable than typical ethernet frames. And two-way communication is, in general, far more complex.
Default Views
These are heavily geared towards Ethernet and TCP/IP, which usually have single source and destination pairs.
Addressing
In 802.3 ethernet addresses, we typically only have a source and destination MAC address, and sometimes a VLAN ID to be concerned with. Of course more complex protocols and encapsulations exist, but the standard ethernet address fields do not vary much. And the default wireshark views work fine.
In WiFi however, we have five “MAC” addresses to content with:
- Transmitter Address (TA)
- Receiver Address (RA)
- Source Address (SA)
- Destination Address (DA)
- Basic Service Set Identifier (BSSID)
Moreover, not all of these addresses are present in each of the fundamental frame types and sub-types. Take acknowledgement frames for example. These only contain an RA. The frame to which the Ack refers is implied by it’s timing. Wireshark would require a some fancy programming to link the two and adjust the display. For example, to show unacknowledged data frames in a different colour. Further, Wireshark places the RA in an Ack in the Destination column by default, which is misleading when looking at thousands of packets.
Other Fields
It doesn’t stop there. To analyse all the elements of a WiFi conversation is complicated. It’s not a simple exchange between two nodes, so we can’t simply follow a source and destination pair, or even high-layer information such as TCP/UDP source and destination ports. We have to look at several different elements of a frame, their timing and the context.
The Bottom Line
Essentially, it’s impossible very difficult to follow and interpret WiFi communications effectively using the default views.
The Solution
After putting up with this for years I recently had a good opportunity to put some focus on this problem and attempt to solve it – or at least improve the situation.
Configuration Profiles
A fully-fledged solution would involve a state machine. But a workable solution using only visual cues turned it to be pretty simple. Recent versions of Wireshark (and perhaps ancient ones?) offer this feature. Basically most aspects of the display can be saved in a profile, and switched between on the fly, based on the type of capture you’re looking at.
Configuration Profiles save a whole range of options, but the ones that seemed the most helpful for this challenge were:
- Column definitions
- Colouring rules
- Filter buttons
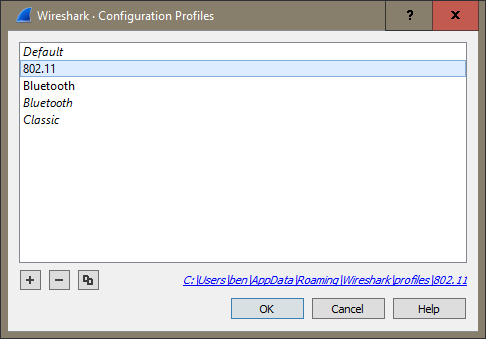
You’ll find Configuration Profiles under the edit menu:

This menu item brings up the following dialogue, and this is how you define a new profile. But you can more easily switch profiles by clicking in the very bottom-right corner of the main Wireshark screen.
We’ve already mentioned default and classic profile. Next I’ll take you through the 802.11 profile I created.
802.11 Profile
Before I do, here’s a sneak peak at how it ended up.

Columns
With screen real estate at a premium, I couldn’t fit in every field I wanted to. But the 5 basic addresses and ESSID were a must. The columns I settled on were:
- Frame No.
- Time
- Protocol
- Channel
- Signal Strength
- Data Rate
- Frame Size
- Packet Size
- Frame Type
- Frame Sub-type
- BSSID
- ESSID
- RA
- TA
- DA
- SA
- Info – built-in context-based field
A couple of potentially useful fields, like the Frame Control Field Flags (say that 10 times fast), were not included. This is because Wireshark did not want to display a nice simple ‘R’ for a retransmits, for example. Instead it prints a long and unwieldy sentence. Luckily flags are already displayed in the Info column so I decided I could live without this.
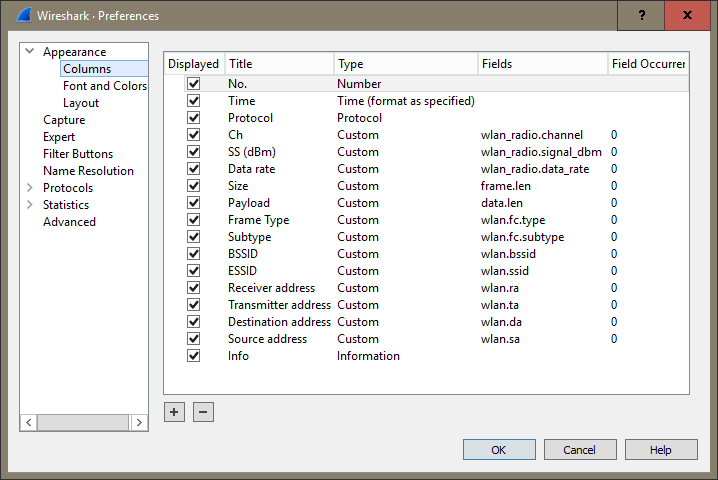
Here are the final column definitions:
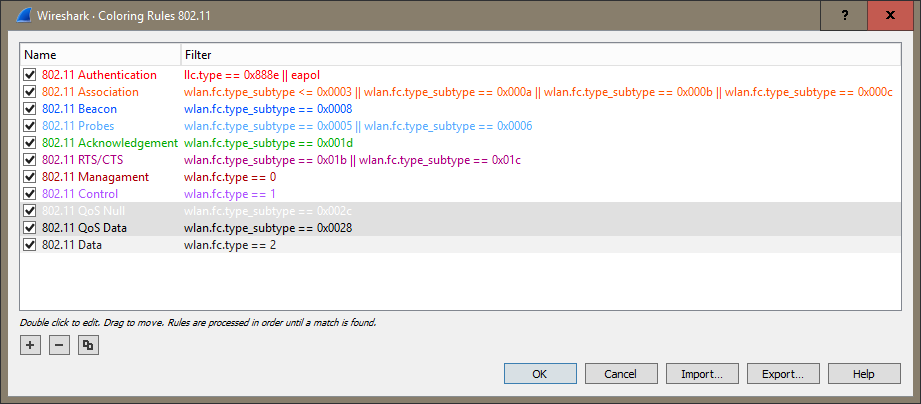
Colouring Rules
In some ways colour is the most important element to facilitate easy interpretation. Our brains are already optimised for it. I aimed for something as simple and subtle as possible. Background colour is the first big clue:
- Management and control frames have a white background
- Data frames have a grey background
- QoS data frames have a darker grey background
Next, we can use the text/foreground colour for some more fine-grained information. I didn’t want to identify every single frame sub-type, just the key ones. Too much colour information would only make interpretation harder. But Acks needed their own colour, as did beacons. Most other types shared a text colour:
- Acks have green text
- Beacons have blue text
- Probes have light blue text
- RTS/CTS frames have purple text
- Frames relating to association & disassociation have orange text
- Frames relating to 802.1x authentication have red text
- Other management frames have deep red text
- Other control frames have violet text
- Null frames have white text
- Other data frames have black text
Here is the final rule set:
These two changes already made interpreting Wi-Fi captures a lot easier.
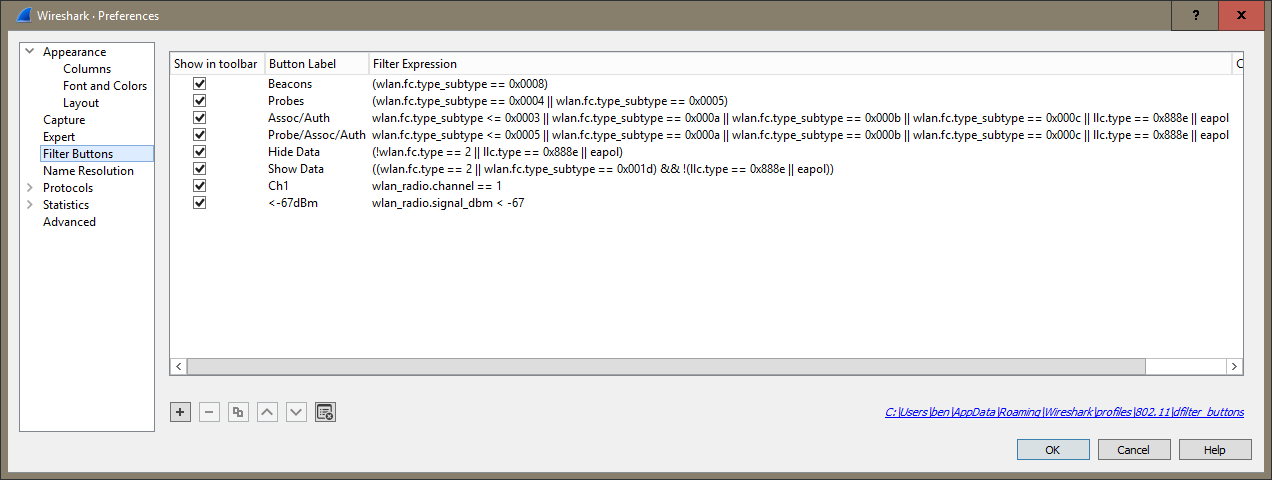
Filter Buttons
For a bit of icing on the cake – or as @WazzFi might say, a bit of Kale on the Vegie Burger, filter buttons offer a quick way to filter your capture without having to use Wireshark’s display filter syntax.
I picked a few of the common filters I might regularly use:
- Beacons – beacons, and nothing but the beacons
- Probes – requests and responses
- Assoc/Auth – any frame relating to the act of joining a WLAN – identical to the orange and red colouring rules
- Probe/Assoc/Auth – combination of the last two
- Hide Data – hides data frames except 802.1x authentication
- Show Data – hides management, control and 802.1x authentication frames
- Ch1 – only shows frames captured on channel 1. Click this then change the number to taste
- <-67dBm – only shows frames captured with less than the shown signal strength. Again click and modify to taste.
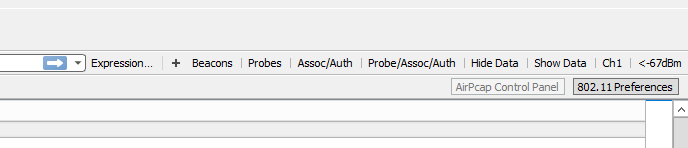
Here are the final definitions:
And the buttons shown up next to the filter bar:
In Practice
So far this scheme has worked out well, and my packet analysis using Wireshark has definitely been streamlined.
Visual Patterns
It’s easy to learn the obvious visual patterns, such as:
- Successful transmission – a grey data frame followed by a green Ack
- Contention – too many purple RTS in row
- Light load – little but beacons
- Many other patterns I’m sure I haven’t thought of yet
ONE-CLICK-SHOP
I’m particularly happy with the filter buttons. Being able to instantly drill down to client association and then flick back to see the broader context of those packets seems to save a bunch of time.
Using the Profile
I’ve made my configuration profile available for download at the bottom of this post.
Installing
It’s very simple to install. You’ll notice at the bottom of the Configuration Profiles dialogue, Wireshark display the path on your system. Simply download the file and unzip to this directory. The folder name is the profile name.
Decryption
It’s worth noting that Wireshark will decrypt frames encrypted with a pre-shared key, provided you have also captured the 4-way handshake. A caution though – when you add a password it’s stored in cleartext in a file in the current Configuration Profile directory. Be mindful of the security implications.
Wireless Toolbar
Another newish feature of Wireshark is the Wireless Toolbar. This seems to be mainly oriented towards capturing rather than display – something I at least don’t do with Wireshark (thank you @adriangranados and Airtool).
Unfortunately, if you do enable this toolbar, it is not saved with the profile and disappears on each new instance of the program. However, it does provide a handy way to quickly access the 802.11 preferences dialogue. Typically you have to open Preferences scroll through a long list of protocols, as shown below:
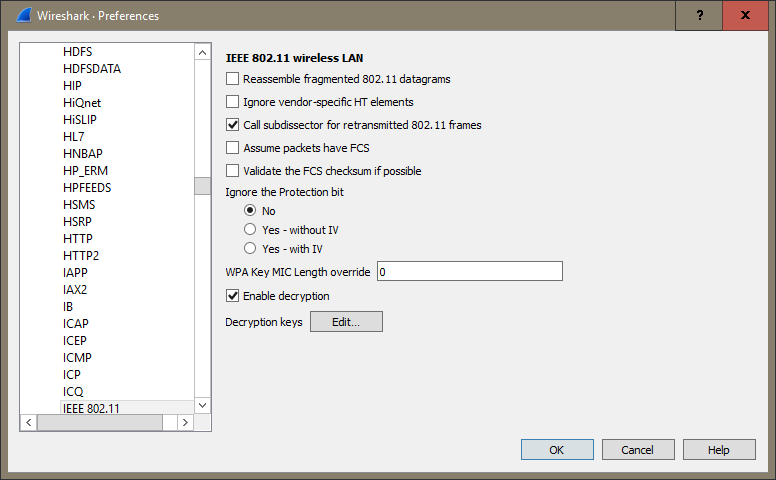
This screen is also where you setup decryption, so worth knowing this shortcut.
RESET THE LAYOUT
A last tip, after you switch profiles, hit Ctl-Shift-R & Ctl-Shift-W to reset the layout for the new profile (⌘-Shift-R, ⌘-Shift-W for Mac).
Download
Download the profile here and let me know your thoughts and suggestions below or on twitter! Of course you might want to customise a few things like the colours to your own tastes.
![]()
Tested on Wireshark version 2.6.1.
Thank you for sharing this useful information.